Zustand combine 미들웨어로 장바구니 상태 타입 추론하기
최근 참여하고 있는 프론트엔드 코드리뷰 스터디에서 간단한 토이 프로젝트를 진행 중이다. 장바구니 기능이 포함된 이커머스 페이지를 만들며, 상태 관리에 초점을 맞춰 구현하고 서로의 코드를 리뷰한다.
그 과정에서 전역적으로 상태를 관리해야할 때 많은 스터디원들이 Zustand를 사용했는데, 나도 회사에서 Zustand를 애용하고 있던 와중 스터디원이 소개해준 덕에 새로운 미들웨어를 알게 돼서 알게 된 내용을 정리해본다. 내부 구현도 Typescript로 매우 짧게 작성되어 있어 타입 추론이 어떻게 이뤄지는지 살펴봤다.
combine 미들웨어의 타입 추론 방식
Zustand의 combine 미들웨어 구현 코드는 정말 짧다. 무려 15줄이다! 그런데도 Generic을 활용한 타입 추론이 제법 정교하게 작동한다. 그래서 처음 봤을 땐 잠깐 멈춰서 이해해야 했다.
소스코드 : https://github.com/pmndrs/zustand/blob/main/src/middleware/combine.ts#L1~#L15
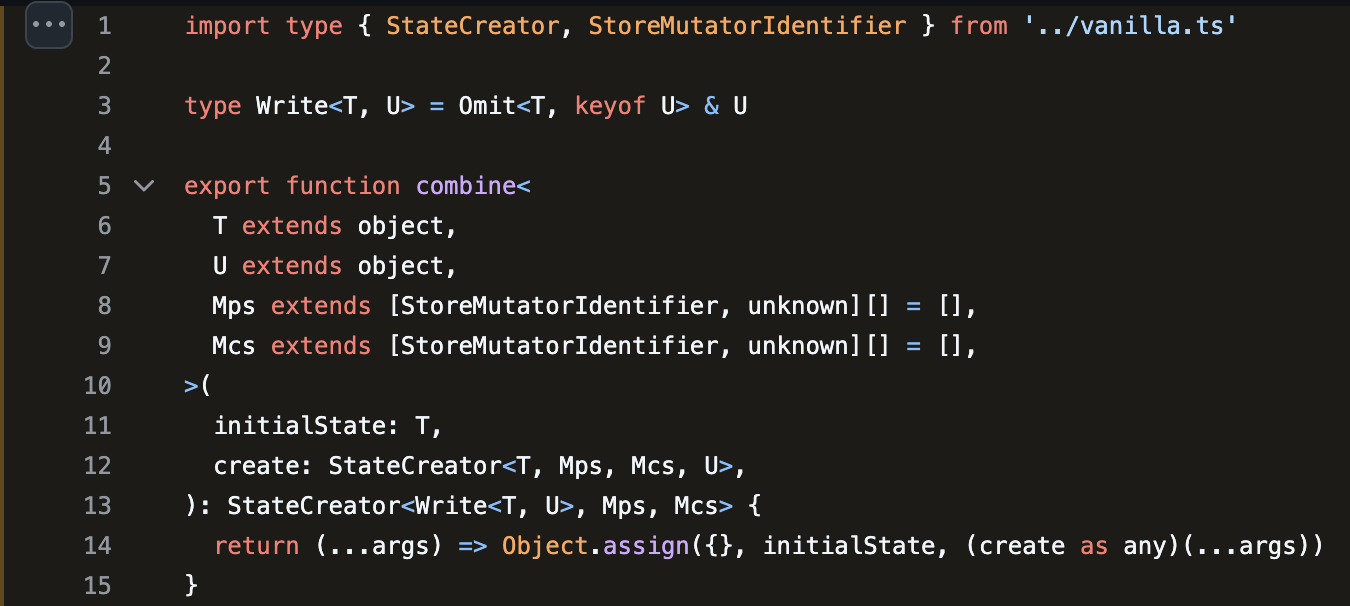
📌 핵심 유틸리티: Write<T, U>
여기서 중요한 타입 유틸이 하나 있다. 이 타입은 T와 U의 충돌되는 키를 제거하고, U로 덮어씌우는 역할을 한다. 결국 최종적으로 반환되는 상태는 T & U 타입이지만, U가 우선시된다.
// T와 U를 합치되, U에 있는 키는 T에서 덮어쓴다
type Write<T, U> = Omit<T, keyof U> & U

// 사용 예시
Write<{ count: number }, { count: () => void }>
// 결과: { count: () => void }
Write<T, U> 정리 :
T와U를 병합하되,U가T의 필드를 덮어쓸 수 있도록 설계됨Omit<T, keyof U>는U와 겹치는 키를T에서 제거- 최종적으로는
T & U와 비슷하지만,U가 우선인 타입
📌 combine의 타입 구조
함수 내부는 단순히 Object.assign으로 병합하고 끝. 하지만 타입 레벨에선 꽤 많은 일이 일어난다.
export function combine<
  T extends object, // 초기 상태 (InitialState)
  U extends object, // 추가 상태 (AdditionalState)
  Mps extends [StoreMutatorIdentifier, unknown][] = [], // Middleware Pipe from previous
  Mcs extends [StoreMutatorIdentifier, unknown][] = [], // Middleware Compose for this layer
>(
  initialState: T,
  create: StateCreator<T, Mps, Mcs, U>,  // 상태 생성자 함수
): StateCreator<Write<T, U>, Mps, Mcs> { // 병합된 타입의 상태 생성자 반환
  return (...args) => Object.assign({}, initialState, (create as any)(...args))
}
📌 타입 추론의 핵심: StateCreator
type StateCreator<
  T,
  Mps extends MutatorIdentifier[] = [],
  Mcs extends MutatorIdentifier[] = [],
  U = T
> = (
  set: ...,
  get: ...,
  api: ...
) => U
StateCreator는 Zustand 상태 생성자 함수의 시그니처를 정의한다.combine에서 이 타입을 활용해set,get의 타입도 자동 추론되게 만든다.- 즉,
combine사용시 :create함수는set,get,api를 받아서U타입의 상태 조각을 리턴- 이 상태 조각 (
U)은initialState(T)와 병합될 예정 - 함수 시그니처를 보면
combine이 리턴하는 건StateCreator<Write<T, U>, Mps, Mcs>다. 이 덕분에create(...)함수 내부에서는set과get이T & U를 기준으로 타입이 잡힘 - 사용자는
initialState와create에서 정의한 상태를 모두 사용할 수 있고, 타입도 자동 추론됨
- 즉,
📌 미들웨어 체이닝
여기서 미들웨어 체이닝(Pipe, Compose)을 할 수 있다는 말이 처음에 좀 이해가 안됐는데, 설명해보면 이렇다.
Mps,Mcs: 미들웨어 파이프를 추적하기 위한 타입 체이닝 시스템이다.StoreMutatorIdentifier는 특정 미들웨어를 식별하기 위한 타입 태그로 쓰인다. 예를 들면 다음과 같은 튜플 형태로 사용된다.
// 체이닝 할 수 있는 미들웨어
['zustand/immer', unknown]
['zustand/persist', unknown]
...
type StoreMutatorIdentifier = string
// indentifier를 기반으로 정의한 타입
type MutatorIdentifier = [StoreMutatorIdentifier, any]
//전체 미들웨어 스택을 타입으로 표현하면
type MiddlewareStack = [ ['zustand/immer', any], ['zustand/persist', any] ]
Zustand는 내부적으로 이걸 통해 “어떤 미들웨어가 적용됐는지”를 추적하고, 각 미들웨어가 set, get, api에 주입한 기능이 있는지를 타입 수준에서 안전하게 관리할 수 있다.
- 각 미들웨어가 독립적으로 구현될 수 있다.
- 필요한 미들웨어를 조합해서 사용할 수 있다.
- 타입 추론도 각 미들웨어가 확장한
set,get,api를 전달받아서 풍부하게 활용 가능하다.
예시: 상태에 persist랑 immer를 같이 쓰고 싶다?
import { create } from 'zustand'
import { persist } from 'zustand/middleware'
import { immer } from 'zustand/middleware/immer'

const useStore = create(
  persist(
    immer((set) => ({
      count: 0,
      increase: () => set((state) => { state.count++ }),
    })),
    {
      name: 'my-storage',
    }
  )
)
여기서 일어나는 일:
1 . immer 미들웨어가 먼저 실행됨 : set을 immer 버전으로 draft-friendly하게 바꿈 (set((state) => { state.count++ }) 가능해짐)
2 . persist가 그 위에 얹힘 : 로컬스토리지에 상태를 저장하도록 set/get/api를 감쌈
즉, immer → persist → zustand core 이렇게 순차적으로 체이닝(chaining) 되어 스토어 생성
결론
결론적으로 타입이 추론되는 구조를 정리해보면 이렇다.
create함수는StateCreator<T, Mps, Mcs, U>타입임- 상태 조각 U를 만들어 반환하고
- 이를 initialState T와 병합해서
Write<T, U>반환 - 미들웨어 체이닝 정보는
Mps,Mcs로 전달됨Mps (Mutator Pipes)→ 이전에 적용된 미들웨어 목록Mcs (Mutator Composes)→ 현재 이 함수에서 적용하는 미들웨어 목록
Zustand의 타입 시스템은 이 combine을 활용할 때 초기 상태와 메서드를 명확히 구분하고 타입을 추론하기 때문에, 별도의 수동 타입 선언 없이도 IDE 자동완성과 타입 검사를 완벽히 지원하게 되는 것이다.
📌 combine 미들웨어는 TypeScript의 강력한 제네릭 + 유틸리티 타입(Omit) + intersection을 조합해서 만들어진 고급 API 라는 생각이 들었다! 멋져!
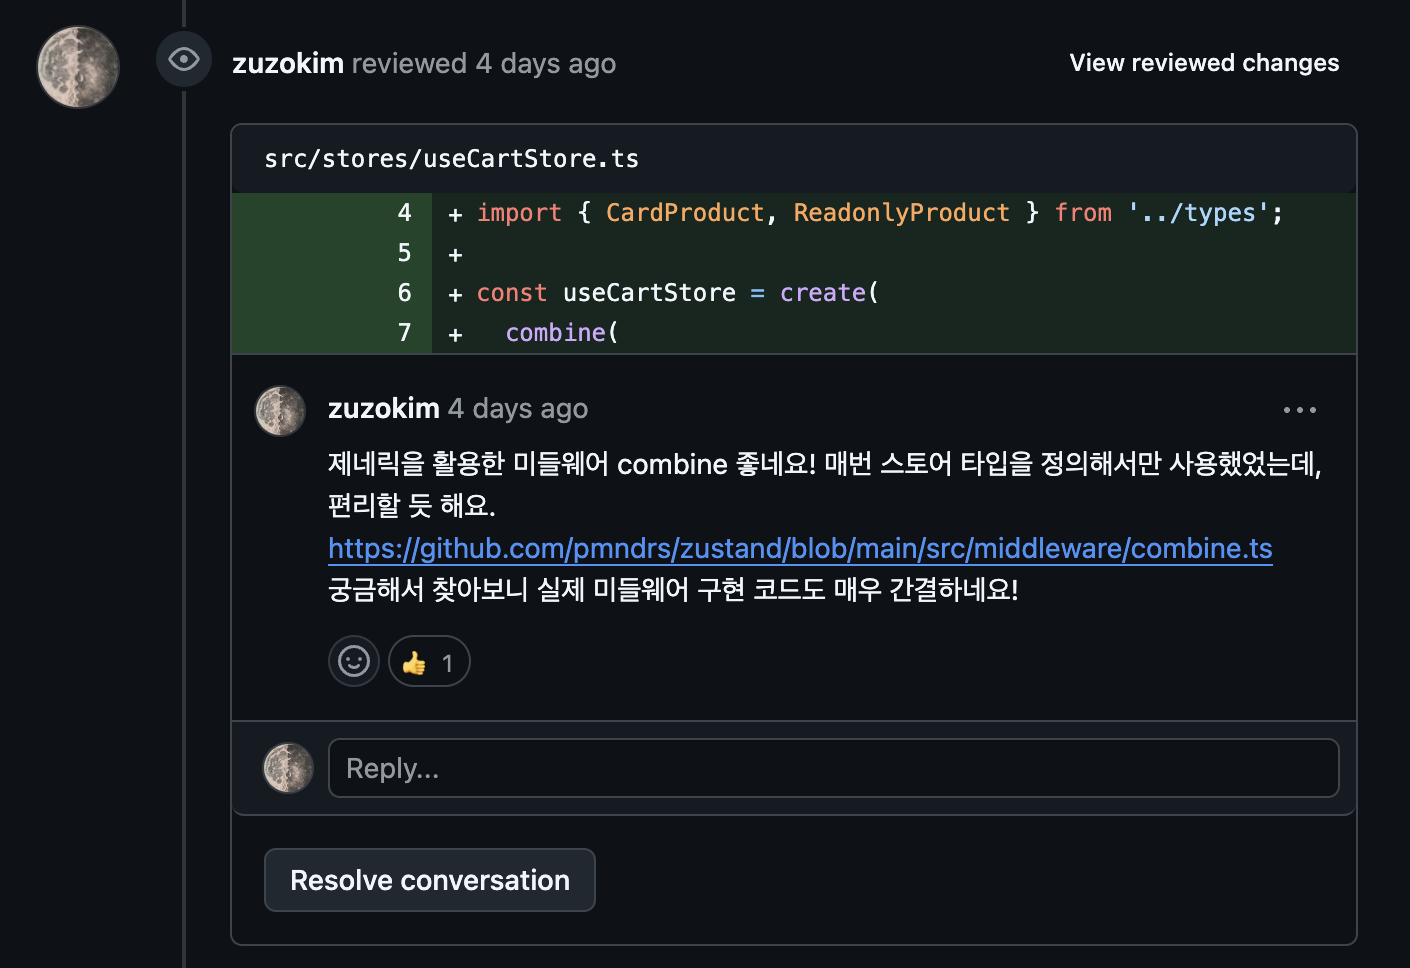
코드 리뷰
그리고 그동안 create 할때 매번 타입을 interface로 정의해서 사용했던 나는 스터디원의 코드를 보고 매우 편리할 것 같다는 리뷰를 남겼었다. ㅎㅎ
리팩토링
기존에 나는 최대한 간결하게 서트파티 라이브러리 없이 구현하고자 했기 때문에 React Context를 사용해서 아래와 같이 구현했었다.
//기존 CartContext.ts
import { ReactNode, useState, createContext } from 'react';
import { Product } from '../products';

export interface CartContext {
	products: Product[];
	addProduct: (product: Product) => void;
	removeProduct: (product: Product) => void;
}

export const CartContext = createContext<CartContext>({
	products: [],
	addProduct: (product) => {},
	removeProduct: (product) => {},
});

export const CartProvider = ({ children }: { children: ReactNode }) => {

const [products, setProducts] = useState<Product[]>([]);

const addProduct = (product: Product) => {
	setProducts((prev) => [...prev, product]);
};

const removeProduct = (product: Product) => {
	const index = products.findIndex((p) => p.id === product.id);
	if (index !== -1) {
		setProducts((prev) => [
		...prev.slice(0, index),
		...prev.slice(index + 1),
		]);
	}
};

	return (
		<CartContext.Provider value={{ products, addProduct, removeProduct }}>
		{children}
		</CartContext.Provider>
	);

};
이 코드는 다음과 같은 단점이 발생할 가능성이 있다:
useState기반이라 비즈니스 로직이CartProvider내부에 갇힘setProducts가 여러 메서드에서 반복 사용됨- 비동기 로직 추가 시 훨씬 복잡해짐
- 테스트/디버깅/분리 어려움
Zustand와 combine 미들웨어를 사용해 다시 구현해보면 이렇게 된다.
// 리팩토링해본 cartStore.ts
import { create } from 'zustand';
import { combine } from 'zustand/middleware';
import { Product } from '../products';

export const useCartStore = create(
  combine({ products: [] as Product[] }, (set, get) => ({
    addProduct: (product: Product) => {
      set({ products: [...get().products, product] });
    },
    removeProduct: (product: Product) => {
      const index = get().products.findIndex((p) => p.id === product.id);
      if (index !== -1) {
        const newProducts = [...get().products];
        newProducts.splice(index, 1);
        set({ products: newProducts });
      }
    },
  }))
);
물론 명시적인 interface로 타입을 작성할 수도 있을 것이다. 이런식으로..
interface CartState {
  products: Product[]
}

interface CartActions {
  addProduct: (product: Product) => void
  removeProduct: (product: Product) => void
}

type CartStore = CartState & CartActions


export const useCartStore = create<CartStore>((set, get) => ({
...
Zustand의 combine 미들웨어를 활용하면, 하나하나 타입을 선언하지 않고도 타입 안정성을 유지할 수 있다. 필요한 상태만 구독해 불필요한 렌더를 방지할 수도 있고, Zustand가 제공하는 persist, immer, devtools 등과 조합하면 더 확장성 있는 상태 관리를 할 수 있다는 장점도 갖는다.